In the previous post we discussed how to use JavaScript to control the HTML audio element. In this post we we take it a step further and build our own custom HTML audio player.
It will be a very simple HTML audio player with play/pause buttons, a timing scrubber, a volume slider with three additional buttons, up volume, down volume, and mute. We will do all of this with vanilla JS.
The HTML Audio Element
We need to discuss couple of things about the audio element. First, we are going to be removing the controls attribute, so that the default player does not show up. Secondly, we are going to preload all of the metadata about the audio so that its length and other meta properties can be used in our design. So you’ll add:
<audio id="my-audio" src="/path/to/your.file" type="audio/mpeg" preload="metadata"></audio>
You could programmatically add the src and other attributes, but displaying it like this might make it easier to understand.
JavaScript Variables To Create
You can go ahead and just paste these into the top of your JavaScript. We’ll use all of them.
var myAudio = document.getElementById('my-audio');

var playButton = document.getElementById('play-button');
var pauseButton = document.getElementById('pause-button');

var currentTimeContainer = document.getElementById('current-time');
var totalTimeContainer = document.getElementById('total-time');
var seekSlider = document.getElementById("seekslider");

var volUpButton = document.getElementById('vol-up-btn');
var volDownButton = document.getElementById('vol-down-btn');
var volMuteButton = document.getElementById('vol-mute-btn');
let volumeSlider = document.getElementById("volume-slider");
Creating the Shape and Design
You can shape your audio player any way you want to. Most people are used to having a play button on the left side, a horizontal volume controller, and a horizontal timer/scrubber.
This is not a tutorial about CSS and design, but more about how to use JavaScript to view and control the audio player. After getting these parts up on a web page, I’ll leave it up to you to style them how you want them. Let’s, at the very least, create some containers to put our controls:
<audio id="my-audio" src="/path/to/your.file" type="audio/mpeg" preload="metadata"></audio>

<div id="audio-player-container">
     <div id="play-pause-container"></div>
     <div id="volume-container"></div>
     <div id="seek-container"></div>
</div>
The Play/Pause Button
Here we are using SVG icons for the play and pause buttons. You can use any sort of image or no image at all.
Let’s add our two SVGs, hiding the pause button by default with a class:
<style>
.display-none {
    display:none;
}
</style>

<div id="play-pause-container">
    <svg version="1.1" id="play-button" ...></svg>
    <svg version="1.1" id="pause-button" class="display-none" ...></svg>
</div>
Be sure to notice the id attributes. You’ll need these to hook into the click events. The JavaScript you will want to use for this is:
<script>
playButton.addEventListener("click", function(){
    myAudio.play();
    playButton.classList.add('display-none');.
    pauseButton.classList.remove('display-none');
});
pauseButton.addEventListener("click", function(){
    myAudio.pause();
    pauseButton.classList.add('display-none');
    playButton.classList.remove('display-none');
});
</script>
We’ll also want to show the play button again after the audio is done playing and hide the pause button. We’ll get into this in the next step as we look at how to compute and determine the current running time of the audio.
Audio Seek and Timeline
Most audio players have some way to “scrub” along a timeline to find the exact spot in time you want to hear. We’ll do this with a input[type=range] element. First lets add the HTML containers we need:
<div id="seek-container">
     <input id="seekslider" type="range" min="0" step="1" value="">
     <div id="seek-values" style="display:flex">
        <div id="current-time" style="flex:1;"></div>
        <div id="total-time" style="flex: 1; text-align:right;"></div>
     </div>
</div>
This will give us the scrubber as well as the current time being played on the left and the total time of the audio on the right:
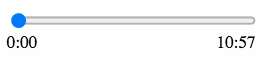
The value of this range will start at 0:00, and later we will wire it up to make the value go up as the music plays. The min value is 0, and the default max value is 100. We will change the default max value in a moment, but if you, for some reason, needed to get and use the percentage of the track already played or yet to be played, you can easily use the value of 100 in your program.
The step value just determines how smooth or and how often the input range gets updated.
Loadedmetadata Event Listener
Let’s display the initial the numbers underneath the range slider. Remember how we preloaded the metadata of the audio track? We will need this meta information to determine how long the audio is. Unbeknown to many people there is an event named loadedmetadata.
myAudio.addEventListener('loadedmetadata', function() {
    totalTimeContainer.innerHTML = myAudio.duration;
    currentTimeContainer.innerHTML = myAudio.currentTime;
});
Both duration and currentTime will come out in seconds, so we will create another function named convertElapsedTime that will convert it into minutes and seconds:
function convertElapsedTime(inputSeconds) {
    var seconds = Math.floor(inputSeconds % 60)
    if (seconds < 10) {
        seconds = "0" + seconds
    }
    var minutes = Math.floor(inputSeconds / 60)
    return minutes + ":" + seconds
}
Putting it all together our event listener will look like this, adding the total and current times to the two elements underneath the slider/scrubber:
myAudio.addEventListener('loadedmetadata', function() {
     totalTimeContainer.innerHTML = convertElapsedTime(myAudio.duration);
     currentTimeContainer.innerHTML = convertElapsedTime(myAudio.currentTime);
});
We also want to initialize the slider’s max value as well as set the value attribute (which in most cases will be 0). So the above event listener, in full will look like this:
myAudio.addEventListener('loadedmetadata', function() {
     totalTimeContainer.innerHTML = convertElapsedTime(myAudio.duration);
     currentTimeContainer.innerHTML = convertElapsedTime(myAudio.currentTime);
     seekSlider.max= myAudio.duration;
     seekSlider.setAttribute("value", myAudio.currentTime);
});
Timeupdate Event Listener
So now you can click on the play button and the audio will play with the start time and end time displayed. What comes next is updating the player values and display as it continues to play. There is another uncommon event that media elements have called timeupdate.
myAudio.addEventListener('timeupdate', function() {
     currentTimeContainer.innerHTML = convertElapsedTime(myAudio.currentTime);
     // The two lines below seem duplicate, but are both needed in some browsers
     // The first one updates the value attribute in the slider
     seekSlider.setAttribute("value", myAudio.currentTime);
     /// The second one keeps the slider handle/thumb moving
     seekSlider.value = myAudio.currentTime;

     // When the audio ends, we need to hide the pause button and show the play button
     if (myAudio.ended) {
        pauseButton.classList.add('display-none');
        playButton.classList.remove('display-none');
     }
});
As the time of the audio gets updated, the attribute in the slider and the time found in the left side #currenttime element will get updated. Also when the audio comes to an end, the play button will then reappear and the pause button disappear.
The Range Input Value
You need one more event listener and that is called change (note: sometimes you’ll see the input event listener used on sliders. Input is triggered when first selected, but change is triggered when the action is done and the final value is set).
seekSlider.addEventListener("change", function () {
     myAudio.currentTime = seekSlider.value;
});
That should do it! If you are using some other JS library or framework, some of the two-way binding might be simpler, but for universal vanilla JS the above should work in any DOM environment.
HTML Audio Volume Controls
Now let’s build another slider, also using a range input element. With it we will add 3 buttons: volume up, volume down, and mute.
First we build the containers:
<div id="volume-container">
     <input id="volume-slider" type="range" min="0" max="1" value="1" step="0.1"> <br>
     <div id="vol-down-btn" class="vol-btn">
        <svg version="1.1" id="vol-down-svg" ...></svg>
     </div>
     <div id="vol-up-btn" class="vol-btn">
        <svg version="1.1" id="vol-up-svg" ...></svg>
     </div>
     <div id="vol-mute-btn" class="vol-btn">
        <svg version="1.1" id="vol-mute-svg" ...></svg>
     </div>
</div>
Here we are using SVGs for buttons, but you can use any div, button, or img file instead. The id attributes are important though, whichever you decide to use.
Now let’s write functions to connect the slider to the audio, binding in each direction:
function setvolume(){
      myAudio.volume = volumeSlider.value;
}
function setvolumeSlider(){
      volumeSlider.value = myAudio.volume;
}
volumeSlider.addEventListener("mousemove", setvolume);
Now let’s put click events on the buttons:
volUpButton.addEventListener("click", function(){
     myAudio.volume+=0.1;
     setvolumeSlider();
});
volDownButton.addEventListener("click", function(){
     myAudio.volume-=0.1;
     setvolumeSlider();
});
volMuteButton.addEventListener("click", function(){
     myAudio.muted = !myAudio.muted;
});
Summary
Now you should have all of the working parts. They might look a little plain right now, but it’s time to put your CSS skills to work to make something really cool. There are a lot of inspirational ideas on CodePen and elsewhere.
In the next post we will discuss some ways to style your custom HTML audio player by showing you how to style the input range slider.
There should be if statements to take care of the range of values for the volume up and down buttons
volume up: if(volSlider.value 0)
thanks a lot for the articles
PS: no spam mails
Thanks. No spam from here.
Amazing tutorial, life saver! helped me a lot
ps: if i could suggest something for the future, i would also love to learn this audio player with next and previous buttons
Thanks a lot for this amazing tutorial!!!
Do u plan to make an follow up with next and previous buttons, like a playlist audio player?
I have not planned to do that, but perhaps now I will!
You might just create a button that switches out the source file src or a completely new div. You could also create a class named current-audio that gets switched, like an image slider would.
if u do, ill be first in line to read it! 😉
it does not work for me …
Here is the previous one.
Can you take a peek?
https://jsfiddle.net/MAORBITON/7j4wc5xs/45/
You have an id named “myAudio,” but your JS variable is looking for an element named “my-audio.” You also have a stray “,” on line 17.